

This do-it-yourself guide illustrate how to install the Prius PLUS Performance rear sway bar onto your 3rd generation Prius. The installation is easier than it seems and can be performed without jacking up the car, if you’re slim enough. While the installation was performed on a 2012 model, the same instruction applies to 2010-2011 and 2013 models. The Installation was straight forward and easy. I was surprised by the fact that I was able to install the bar without lifting the Prius, and the Prius is lowered on the PLUS Performance lowering springs! It was a tight squeeze but possible nonetheless. If you’re as slim as I am and aren’t claustrophobic, give it a shot. Otherwise, you might need to jack up your Prius on jack stands or reverse it onto automotive ramps for better clearance.
![]() I ordered this part from Toyota Part World, the same online parts dealer where I ordered my PLUS Ground Effects kit. The price of the rear sway bar is $212.55, shipping from WA to Southern California totaled out to $250.00. Ordered the kit on a Monday morning and received it on the following Monday.
I ordered this part from Toyota Part World, the same online parts dealer where I ordered my PLUS Ground Effects kit. The price of the rear sway bar is $212.55, shipping from WA to Southern California totaled out to $250.00. Ordered the kit on a Monday morning and received it on the following Monday.
As with other DIY guides, common sense and judgement should be used. This guide is written solely for educational purpose only. Neither warranty is expressed nor implied.
Unboxing
The Prius PLUS Performance rear sway bar arrived in a large rectangular unmarked shipping box. Only sign that this is a shipment from Toyota is the TRD label affixed at one end with the part description and part number. The package includes the rear sway bar and all necessary hardware to complete the install, minus the tools.

Prius PLUS Performance rear sway bar shipping box
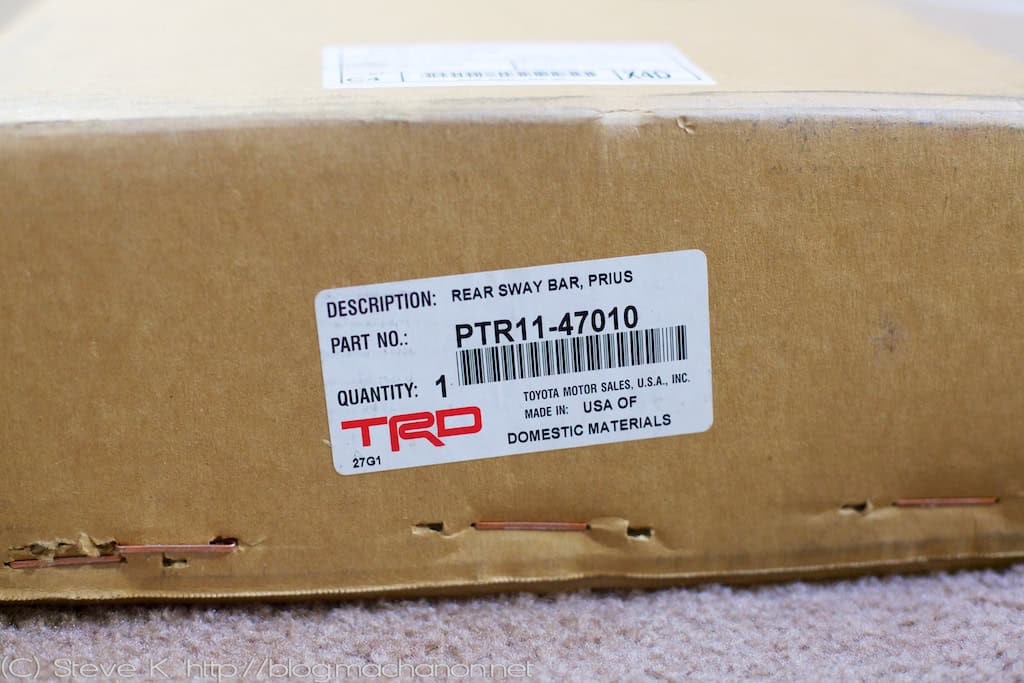
Prius PLUS Performance rear sway bar part number

Prius PLUS Performance rear sway bar hardware

Content of hardware box
Parts Included
Use this check list to ensure that all of the parts are accounted for and intact:

Prius PLUS Performance rear sway bar PTR11-47010

Nuts and bolts (component of part #PTR11-47011)
")
End links (PTR11-47012)
")
Bushings (component of part #PTR11-47011)
")
Bushing clamps (component of part #PTR11-47011)
")
Bushing grease (component of part #PTR11-47011)
Note that the bushings, bushing clamps and nuts & bolts bag replacement is available separately as a set, part number PTR11-47011.
Installation Guide
For the installation, I made few changes from the included installation sheet to simplify the process. I wrote this guide on the basis of installation without lifting the car up. As with other DIY guides, common sense and judgement should be used. This guide is written solely for educational purpose only. Neither warranty is expressed nor implied. I encourage you to read this guide thoroughly at least once to assess your capability of performing the mod on your own. If you cannot or don’t have the tools, I recommend you consult with a qualified installer to help you with the install.
Step 1
Begin the installation by greasing the bore on the rubber bushings, then install the bushings onto the grooves on the rear sway bar.


Step 2
You’ll notice that the end links are marked left and right handed, so install them into the correct side. Each end link also have two studs. It doesn’t matter which stud is installed onto the rear sway bar or the coil spring perch as they both are the same length and they are connected to the end-link body via a ball joint, so they can be rotated as needed. Remove the protective cover and insert one stud into the hole located directly in front of the lock nut that’s holding the shock absorber onto the coil spring perch.
")
This hole is hard to see and the instructions tell you to remove the shock absorber bolt for clearance. I did not do this and just installed the end links by touch and feel. There is an opening beneath the coil spring perch that’s large enough to maneuver your fingers through to manually screw in the nut onto the stud. I tighten the nut in place with a 15 mm hand wrench (44 N-m, 32 ft-lb).
")
In order to tighten the upper end-link nut without lifting the car or removing the shock absorber, I had to maneuver the wrench over the shock absorber’s lock nut stem closest to the end-link. It’s quite a task but not impossible, about 5-10 minutes per side. Repeat the same process for the remaining end-link. When tightening the nut, ensure that the end-link is parallel to the perch.
Step 3
Place the outer bushing clamps (the bent triangular clamps) over the rear axle beam with the horizontal tab facing towards the rear of the car.

The instructions stated the correct position for these outer bushing clamp be placed 9.25″ or 23.5 cm inward from the beam axle re-enforcement. I didn’t bother to measure. I estimated the location and placed them over the beam axle. Since the rubber bushings on the rear sway bar have grooved strapping that’s design to align with the lower bushing clamps anyways, you can adjust accordingly when its time to tighten the clamps down.
Step 4
Hang the rear sway bar beneath the beam axle to secure the sway bar’s mounting tabs onto the end-links. If you’ve lifted your car, you may need a second set of hands to help hold the bar but manageable with one person. Using industrial Velcro strips, bungee cords or heavy duty zip ties, hang the sway bar under the beam axle overhead. Since I did not lift the car up in any way, I simply placed the the rear sway bar hardware box vertically on the ground to hold up the bar on the right side while I began mounting the bar onto the end-links.


Step 5
Insert the lower end-link studs into the sway bar mounting tabs and hand tighten the nuts for support.

Prius PLUS rear sway bar engaging right end-link stud

Prius PLUS rear sway bar engaging left end-link stud
Step 6
Once the rear sway bar is hand-tightened onto the lower end-link studs, it’s time to tighten the nuts on the bushing clamps. Orient the lower bushing clamps (horizontal clamps with short vertical tab) with the outer bushing clamps while ensuring that the vertical tab face the front of the car. Hoist the rear sway bar into the beam axle, making sure the rubber bushing is inserted correctly (triangle tip upward, base with clamp strap groove downward) and then hand-tighten in the nuts on the bushing clamps so that the clamps will hold the rear swap bar in the beam axle, alleviating muscle strain. As soon as both clamps are hand-tightened, the rear sway bar will sit in the beam axle and ready to be secured into place.
I had to use a 13 mm hand wrench in conjunction with a socket and ratchet wrench with a size 1/2″ socket to keep the nut from rotating the bolt as I tighten. For the horizontal nut, I held the back of the bolt with the socket and tighten the nut with a 13 mm hand wrench. For the vertical nut, I held the nut with the 13 mm hand wrench while tightening the bolt with the socket wrench.

Be sure the lower bushing clamps are fed over the corresponding track on the bottom of the rubber bushings. The recommended order of installation is to install the horizontal nut first and then the vertical nut:

Install horizontal bolt first.

Install vertical bolt second.
Tighten the nuts so that the there isn’t a gap between the tabs on the outer and lower clamps. Keep an eye on the washers while installing the clamps:

The above pic shows my initial installation without paying attention to the position of the washers. One washer per side whereas I accidentally installed two washers on one side as shown. I had to re-do this clamp, which took about another 10 minutes.

Repeat the same mounting process for the remaining set of bushing clamps.
Step 7
Tighten the nuts on the rear sway bar mounting tabs mounted onto the lower end-link studs with a 15 mm hand wrench (44 N-m, 32 ft-lb).
")

Verdict
There is definitely an improvement on the rear suspension when fast cornering is involved or driving on windy, curvy roads at high speed. Does the sway bar transform the Prius into a whole different car? No. There’s no doubt that the rear sway bar make the heifer Prius feel more planted to the ground, but don’t kid yourself comparing this modest upgrade to the handling of an Audi or BMW. You may hear and/or feel subtle “clicks” and “pops” from the rear of the Prius when making wide turns or running over bumps. This is result of the end-links adapting to the energy that’s flexing the chasis being absorbed by the rear sway bar. If you hear constant or excessive sounds from the rear of your Prius, check that all nuts are secured tightly, especially the ones on the end-links.
I recommend checking all the nuts periodically, every 5,000 miles. They may loosen up overtime so it’s always a good idea to check and ensure everything is bolted on tightly. It’s also a good idea to replace the end-links every 75,000 miles, depending on their state of wear and tear. Toyota do sell end-link replacements, part number PTR11-47012.
If you drive the Prius like 95% of the Prius drivers on the road, you probably wouldn’t notice much of a difference. But if you drive it semi-aggressively (semi-aggressively relative to 95% of the Prius drivers on the road), then it is a very nice upgrade indeed. I was behind a 2012+ Prius with the PLUS package one day and can see the PLUS rear sway bar from my driver seat. Can’t wait to see what the Tanabe strut tower bar can do in terms of steering.

Next up I will take the PLUS’ed Prius through California highway 1 on our next trip to Monterey county and put the TRD rear sway bar + TRD sports suspension springs combo to the full test.
How Long was the Installation Process?
I installed the Prius PLUS rear sway bar without lifting the car, which is lowered on Prius PLUS Performance sport coil springs. The entire installation, including taking photographs was 54 minutes:

Time it took to install rear sway bar
Of course if I didn’t have to redo the left bushing clamps with the incorrectly installed washers, I would’ve shaved 10 minutes, completing the entire install in just 43-45 minutes. If I didn’t squeeze in and out beneath the car to take photos, I’d probably save another 10 minutes. So realistically, about 35-40 minutes to install with basic tools and without lifting the car up.
Hello! I own a 2012 Toyota PriusV and wonder if there’s a similar such product that could be installed on it. Please advise. Thank you!
Will this sway bar work with Prius Plug-in?
Yes.
Do you have a DIY for the TRD springs??
No DIY guide for springs; I had my TRD springs installed by a local Toyota dealer.
Just did this today! Took me 2.5 hours — I have a bad back, so had to take a lot of breaks. Also, my fingers are short and fat, so made it hard to get the end links on. This made a huge difference in handling!
Wow! If you did this in 53 minutes and change and would’ve done it in even less time were it not for a few mistakes, you my friend are SUPER MAN!I installed mine two days ago using both the supplied instructions and your tutorial and it took me a few hours! Of course, I’m not super skinny, so it was very difficult to move around under the car while working on it, not to mention the fact that I’m recovering from knee surgery. Mobility issues slowed me down even more.
But still, 53 minutes?! If I’d had a lift to work under than I probably could’ve done it in an hour, but not on the ground, no way. Way too tight. I ended up removing the lower shock mount bolts, as there was no way on God’s green Earth could I thread those nuts onto those studs without doing so. Tightening them with a wrench is another story. How on Earth did you get a wrench in there and then have room to turn it?! Removing the shock mount was by far simpler for me and I was able to push and hold the shock back into position so that I could reinstall the mounting bolt without too much trouble.
All that being said, your tutorial helped me immensely, as the supplied instructions were somewhat vague and the pictures too grainy to make out much detail. I greatly appreciate the time and effort you put into this! The sway bar by no means turned my Prius into SCCA Autocross car, but it corners much flatter and without a fight like it did before. I didn’t realize how badly the car understeered and pushed through the turns until I installed the sway bar. Now it handles better and more safely and how it probably should have from the factory. Much safer I think, if nothing else. Maybe it’s just me, but it feels like the rear of the car rides a little higher and doesn’t squat and feel like it’s going to bottom out through dips in the road like it did before. Illusion or not, I’ll take it!
(I still think you must be Houdini or some other contortionist/escape artist in real life!)
Very nice write up! If you haven’t already, you should check out http://www.priuschat.com
Other members on PriusChat could really benefit from your knowledge. It’s always nice to find modder’s like you who aren’t afraid to get their hands dirty and do the work themselves!
I know this post is almost a year old, but I thought I’d complement you anyway.
Take is easy,
Dave
Thanks Dave for the comment. I’m actually on PC as “Steve Type-4” but haven’t had time to participate as frequently as I’ve done so in the past due to time constraints. I barely have time to manage my own blog!
I am Motomura.
I live in Japan.
The report written by you was read.
Since I also got interested, I will also attach next week.
This website is a site which is popular in Japan.
What do I need to check the nuts? Just a 13mm socket or what?
Just a socket wrench. You’ll know if the end-links are loose if you hear constant popping sound when you run over even the smallest dip/speed bump.