

If your 3rd gen Prius is approaching or passed the 100,000 mile mark, it’s time to replace the positive crankcase ventilation valve (PCV valve). If your Prius is consuming noticeable amount of motor oil, say 1 quart every 2,000 ~ 3,000 miles, the PCV valve may be clogged with carbon build-up and may need to be changed. It’s definitely a cheaper solution than to tear apart your engine block and search for a leaking piston ring. If your MPG has decreased to the 40’s MPG range instead of 50’s or higher range, the PCV valve may be one component of a number that needs to be cleaned or replaced (other components to review includes spark plugs, exhaust gas recalculation valve [EGR], EGR cooler, throttle body and intake manifold).
The part costs between $8 – $11 depending on where you source it from and replacing it is relatively simple with the right tools. Getting to it, on the other hand, is another story.
Parts and Tools Needed
- Genuine Toyota positive crankcase ventilation sub-assembly (part #: 12204-37010)
- 22 mm or 7/8 deep socket
- Ratchet (accessing the PCV valve using a ratchet with a pivoted head [aka flex head] will make the job easier but not required)
- Loctite 271 (Equivalent to Toyota recommended Three Bond 1324 sealant) – if your PCV does not come with lock sealant (green substance on thread)
If you are cleaning the intake manifold, you can easily replace the PCV valve at the same time. The PCV valve is located behind the intake manifold on the engine block and requires access from underneath. If the intake manifold is removed for cleaning, the PCV valve will be completely exposed from the engine bay for easy removal.
If you are exchanging either of the inverter coolant, the engine coolant or automatic transmission fluid which all requires jacking up the Prius and removal of the engine under body cover, you can replace the PCV valve at the same time. Access to the PCV valve without removal of the intake manifold requires that you remove the engine under body cover and remove and replace the valve from underneath the car.
I replaced the PCV valve on my 3rd gen 2012 Prius four at approximately 120,000 miles while exchanging the automatic transmission fluid. Basically two maintenance service in one afternoon sitting.
Removing the Engine Under Cover
Because you’ll be working underneath your car, safety goggles are an absolute necessity. Do not attempt unless you are wearing a pair.
Working on a flat and level surface, place wheel chocks on the rear wheels and then jack up the front of the car. Place a jack stand on each front jack support on the chassis.


In order to access the PCV valve, you’ll need to remove the engine under cover. This involves removing six 10 mm bolts and 13 push-pin retainer clips. If the clips are worn and brittle, this would be a good time to replace them.


Removing both clips and bolts should take you approximately 15 minutes if it is your first time and subsequently quicker. This is what the cover looks like and where the bolts (yellow) and clips (red) are located to visually help you expedite the removal process:

Since removing the engine under cover is an involved procedure in itself, you might want to consider performing these maintenance service at the same time if possible:
- Inverter coolant change
- Engine coolant fluid exchange
- Automatic transmission fluid exchange WS
- Replacing the positive crankcase ventilation valve (PCV)
Doing all aforementioned services together should take you approximately 3 hours. One thing to note, the PCV vale is located directly beneath and behind the plastic intake manifold.
If you are removing the intake manifold to do other service, such as replacing the water pump/thermostat, replacing manifold gasket or just simply cleaning the throttle body or manifold, you can access the PCV valve easily. I recommend changing out the PCV valve at the same time:
Step 1
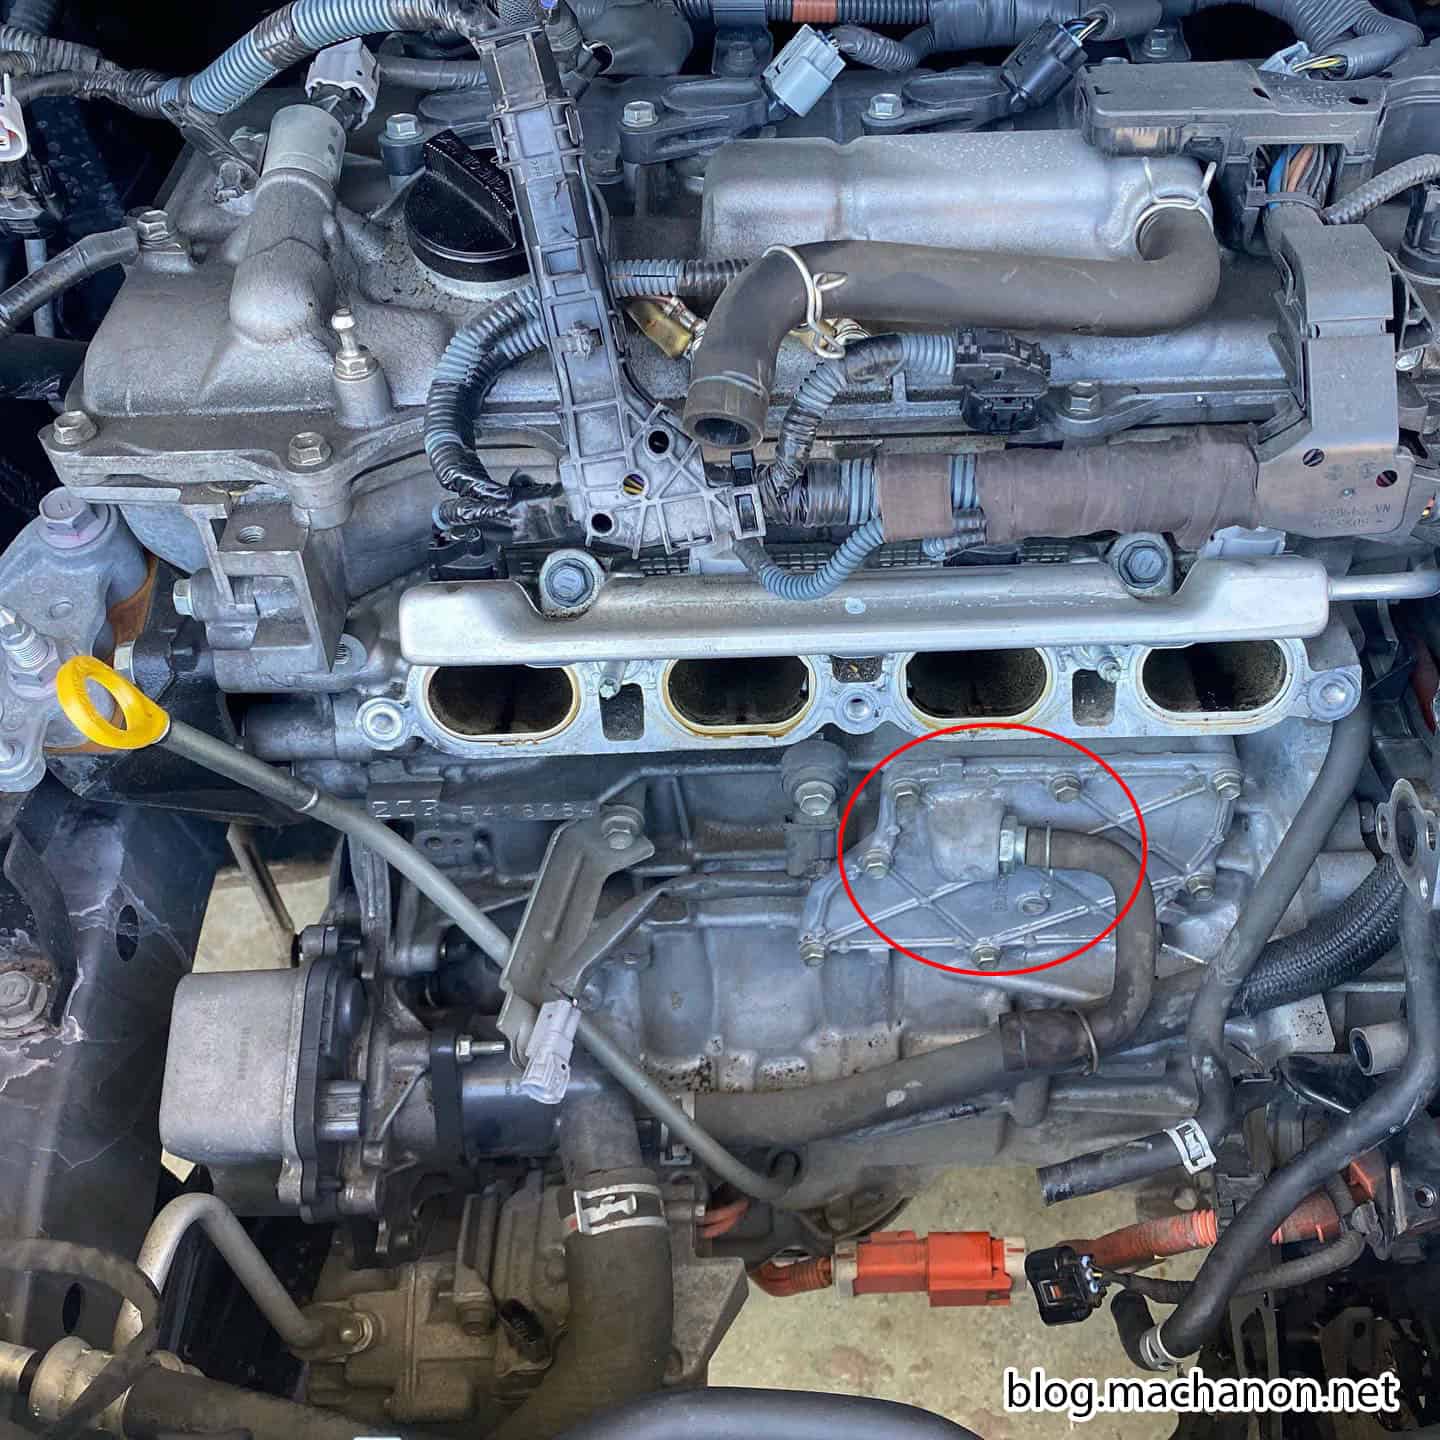
With the engine under cover removed, locate the PCV valve. It is located right behind the intake manifold (black part with ridges) and on the engine block. If you have a hard time finding it, look for a bright orange power cable, then follow the cavity straight up.

There is a hose connected to it:

Step 2
Slide the orange cable harness out of the way by using a Flathead screwdriver to lift a small tab securing the harness onto a metal bracket. Slide out and push aside for clearance.
Pinch the hose clamp with your thumb and index finger and slide it to the left along the hose. Remove the hose from the PCV valve:

Step 3
Attach a 22 mm deep socket onto a ratchet (if you have one, use a ratchet with a pivoted head, aka flex ratchet).

Step 4
Reach up towards the PCV valve with your 22 mm deep socket and ratchet and then couple the socket with the PCV valve.

Unbolt. Because of clearance issue and the thread of the original PCV valve has bolt adhesive applied, you’ll need to use force to break it free from the engine block. Once you can begin rotating it with your ratchet, it should take you between 5~10 minutes to remove due to the limited clearance you have available to turn the ratchet per minute.
Here’s a comparison of the old PCV valve at close to 120k miles vs. a brand new replacement valve:


The replacement valve costs only $8, so it’s pointless to clean the old PCV valve.

Step 5
If the new PCV valve does not have thread sealant (thread with green substance), apply Loctite 271 nut and bolt adhesive to 2 threads on the new PCV valve. Hand tighten back onto the engine block.

Once hand tighten, tighten with socket and ratchet. Torque spec: 20 N·m (204 kgf·cm, 15ft·lbf)

Step 6
Plug the black rubber hose back onto the PCV valve. Pinch the hose clamp and reposition it over the PCV valve. Clip the orange cable harness back to its metal bracket.

Step 7
Re-install the engine under cover. Between replacing the PCV valve and exchanging the automatic transmission fluid, the Prius literally feels like it just drove off the dealer lot, brand new. It drives so much smoother and quieter. I will be keeping my eyes on how the fuel efficiency is affected by these two services.
Nice write-up.
There was not screen shot of the EGR cooler (before/after)
Hey your blog is awesome. Just did spark plugs this weekend at 100k, coolant, trans fluid, PCV planned in two weekends when I have more time.
Did you get around to doing the EGR cleaning? or Induction cleaning?
Hey thanks for stopping by. I did the EGR cleaning and it was a royal pain in the a$$. I cleaned the air intake manifold too, not as bad as the EGR but still involved.
Do you recommend the EGR, how was the buildup?
Yes, if you’ve clocked over 100,000 miles. I believe my mileage was around 130k when I did the EGR clean up. It took two whole cans of brake cleaner and a trip to the power washer to make it clean again. On hindsight, it would probably be easier to just buy a used EGR from a wrecked low-mileage Prius in the junk yard, lol. But since my car was in pieces and removing the EGR was a pain in the a$$, I just marched forward and finished the job. Took almost an entire day with conventional tools. I think I’ll continue with the EGR clean-up DIY tutorial write-up, it’s quite a lengthy write up. I should mention that I did the clean up also because the Prius was experiencing sporadic cold-start up rattles back in winter/Feb 2018, triggering P0401 code.
Here’s a before and after shot of the EGR cooler.